Содержание
Многие настольные приложения предлагают функции манипуляции и настройки. Эти функции обычно (не всегда) находятся в другом окне, чем исходное приложение, поэтому при работе с Electron вам необходимо научиться обмениваться информацией из одного окна в другое.
В этой статье мы покажем вам, как вы можете использовать IPCMain а также IPCRenderer Модули Electron для достижения этой простой задачи.
Заметка
Процесс может быть сделан двунаправленным, так что вы можете следовать, чтобы отправить информацию из первого окна во второе окно и наоборот.
1. Настройте 2 окна (необязательно)
Если у вас уже есть 2 экземпляра Windows в основном процессе, пропустите этот шаг. В нашем примере у нас будет 2 окна с переменными mainWindow а также secondWindow, Эти окна создаются в основном процессе (из main.js), и они будут отображаться одновременно, так что вы можете изменить их поведение, если хотите. Важно то, что у вас есть 2 Windows, и они доступны через переменные:
// Keep a global reference of the windows object, if you don't, the window will
// be closed automatically when the JavaScript object is garbage collected.
let mainWindow;
let secondWindow;
function createWindow() {
// Create the browser window.
mainWindow = new BrowserWindow({ width: 800, height: 600 });
secondWindow = new BrowserWindow({ width: 800, height: 600 });
// and load the index.html of the app.
mainWindow.loadURL(url.format({
pathname: path.join(__dirname, 'index.html'),
protocol: 'file:',
slashes: true
}))
// and load the second window.
secondWindow.loadURL(url.format({
pathname: path.join(__dirname, 'otherfile.html'),
protocol: 'file:',
slashes: true
}))
// Emitted when the window is closed.
mainWindow.on('closed', function () {
// Dereference the window object, usually you would store windows
// in an array if your app supports multi windows, this is the time
// when you should delete the corresponding element.
mainWindow = null;
secondWindow = null;
})
}
Оба окна загружают 2 разных HTML-файла.
2. Добавьте слушателя в основной процесс для обмена данными между окнами
Теперь, когда у вас есть 2 окна, которые будут взаимодействовать друг с другом, вы можете создать конечную точку в главном процессе, которая будет служить мостом между ними. Используя модуль Electron ipcMain, вы можете добавить «слушатель событий» в главном (фоновый процесс), где у вас есть доступ к 2 окнам, затем это событие может быть вызвано из вида первого окна с помощью ipcRenderer.
Следующий код добавляет один прослушиватель событий (в main.js), который будет выполнен, когдаrequest-update-label-in-second-windowСобытие ‘(имя dat) запускается в представлении первого окна. Внутри обратного вызова, как вы находитесь в main.js файл, где 2 окна доступны, вы можете получить доступ к webContents свойство окна, куда вы хотите отправить информацию. webContents является EventEmitter Он отвечает за отображение и контроль веб-страницы и является собственностью BrowserWindow объект. С использованием send метод, вы можете вызвать событие в процессе рендеринга второго окна (а именно action-update-label):
const { ipcMain } = require('electron');
// Attach event listener to event that requests to update something in the second window
// from the first window
ipcMain.on('request-update-label-in-second-window', (event, arg) => {
// Request to update the label in the renderer process of the second window
// We'll send the same data that was sent to the main process
// Note: you can obviously send the
secondWindow.webContents.send('action-update-label', arg);
});
Теперь наш мост на заднем плане построен. В качестве следующего вам нужно построить точку входа на мост во втором окне.
3. Добавить слушателя в окне второго окна для получения данных
Остальная логика очень очевидна, когда вы запускаете событие action-update-label из основного процесса, вам нужно что-то сделать во втором окне, когда это событие инициируется. Продолжить добавление прослушивателя событий с помощью модуля ipcRenderer в процессе рендеринга второго окна (otherfile.html) со следующим кодом:
// Require ipcRenderer
const { ipcRenderer } = require('electron');
// When the action-update-label event is triggered (from the main process)
// Do something in the view
ipcRenderer.on('action-update-label', (event, arg) => {
// Update the second interface or whatever you need to do
// for example show an alert ...
alert("Hello, you did something in the first window !");
// arg contains the data sent from the first view
console.log(arg);
});
Теперь, когда событиеrequest-update-label-in-second-windowзапускается из первого окна в основном процессе, основной процесс вызовет action-update-label событие, которое будет делать то, что вам нужно.
4. Триггер поделиться событием
В качестве последнего шага, вам нужно только вызватьrequest-update-label-in-second-window‘в первом окне (в процессе рендеринга):
const { ipcRenderer } = require('electron');
// Some data that will be sent to the main process
// Feel free to modify the object as you wish !
let Data = {
message: "Hello World !"
};
// Trigger the event listener action to this event in the renderer process and send the data
ipcRenderer.send('request-update-label-in-second-window', Data);
Это будет следовать указанной логике, посылая Data объект с сообщением свойства процессу рендеринга во втором представлении.
пример
Следующие 3 примера на основе файлов иллюстрируют упомянутые шаги в простом приложении:
main.js
const electron = require('electron');
const path = require('path');
const { ipcMain } = require('electron');
// Module to control application life.
const app = electron.app;
// Module to create native browser window.
const BrowserWindow = electron.BrowserWindow
const url = require('url')
// Keep a global reference of the windows object, if you don't, the window will
// be closed automatically when the JavaScript object is garbage collected.
let mainWindow;
let secondWindow;
function createWindow() {
// Create the browser window.
mainWindow = new BrowserWindow({ width: 800, height: 600 });
secondWindow = new BrowserWindow({ width: 800, height: 600 });
// and load the index.html of the app.
mainWindow.loadURL(url.format({
pathname: path.join(__dirname, 'index.html'),
protocol: 'file:',
slashes: true
}))
// and load the second window.
secondWindow.loadURL(url.format({
pathname: path.join(__dirname, 'otherfile.html'),
protocol: 'file:',
slashes: true
}))
// Attach event listener to event that requests to update something in the second window
// from the first window
ipcMain.on('request-update-label-in-second-window', (event, arg) => {
// Request to update the label in the renderer process of the second window
secondWindow.webContents.send('action-update-label', arg);
});
// Emitted when the window is closed.
mainWindow.on('closed', function () {
// Dereference the window object, usually you would store windows
// in an array if your app supports multi windows, this is the time
// when you should delete the corresponding element.
mainWindow = null;
secondWindow = null;
})
}
// This method will be called when Electron has finished
// initialization and is ready to create browser windows.
// Some APIs can only be used after this event occurs.
app.on('ready', createWindow)
// Quit when all windows are closed.
app.on('window-all-closed', function () {
// On OS X it is common for applications and their menu bar
// to stay active until the user quits explicitly with Cmd + Q
if (process.platform !== 'darwin') {
app.quit()
}
})
app.on('activate', function () {
// On OS X it's common to re-create a window in the app when the
// dock icon is clicked and there are no other windows open.
if (mainWindow === null) {
createWindow()
}
})
index.html
Electron Application
Hello First Window
const { ipcRenderer } = require('electron');
document.getElementById("btn").addEventListener("click", () => {
// Some data that will be sent to the main process
let Data = {
message: document.getElementById("field").value,
backgroundColor: "black",
color: 'white'
};
// Trigger the event listener action to this event in the renderer process and send the data
ipcRenderer.send('request-update-label-in-second-window', Data);
}, false);
otherfile.html
Electron Second Window
Hello Second Window
Hello This Label Will be updated
const { ipcRenderer } = require('electron');
ipcRenderer.on('action-update-label', (event, arg) => {
// Update the second window label content with the data sent from
// the first window :) !
let label = document.getElementById("label");
label.innerHTML = arg.message;
label.style.color = arg.color;
label.style.backgroundColor = arg.backgroundColor;
});
Выполнение предыдущего кода в Electron, отобразит 2 окна. В первом окне вы найдете простой ввод текста и кнопку, при нажатии на которую он отправит объект со стилем CSS (цвет фона черный и цвет текста белый) и текст ввода во второе окно. Во втором окне этот объект будет обработан и показан в виде:
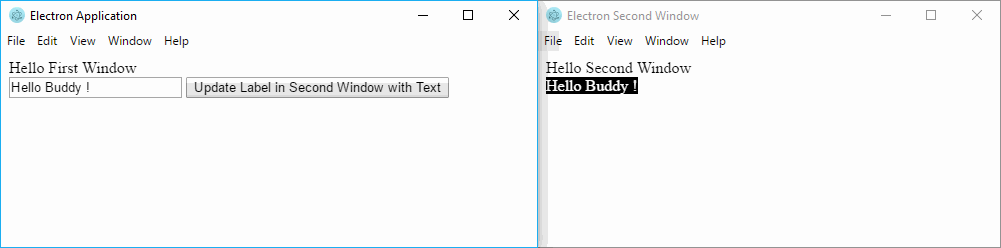
Обратите внимание, что вы можете следовать тому же процессу, но в перевернутом виде (от второго окна к первому).